Archive | TOOL TIPS

Tool Tip Tuesday: Keep It Straight

122334s

When you use the Simply Scored (122334) tool to score a line on a rectangle, it’s easy: just line up the card stock on the top edge and the left edge, right? But when you want to score something that doesn’t have straight edges (like a die-cut Top Note), it can be hard to follow the grooves on the Simply Scored tool. So, do what I did: use a Silver Sharpie pen to trace one of the lines from top to bottom. Then it is easy to position the shape at the top and bottom along that line and score.

dashed-blog-divider

0

Tool Tip: Embossing Buddy, Not Just for Embossing!

The Embossing Buddy103083s

The Embossing Buddy (103083) is a great tool to use to help you create a clear embossed image. Brush it over your cardstock before you stamp your image with VersaMark, add embossing powder and then heat emboss. Any unwanted embossing powder won’t stick.

Here’s my TIP: When you make a shaker card and use the Foam Adhesive Strips (141825), rub the Embossing Buddy around the inside of the tape once adhered to your card, but before you add your confetti. This will help remove any stickiness. Once your confetti is sealed inside the shaker card, it won’t stick to the sides.dashed-blog-divider

0

Tool Tip: Make Masking Easy

Do you love the Masking Technique, but hate to cut out the masks? Well, here’s a simple solution for this problem.

When you receive your wood or clear mount stamp sets, save the brown paper backing from the stamps after you’ve assembled them.  Use these as your masks. They’re a perfect fit.  Store the paper backing in the stamp set case and you’ll have them handy for your next masking project!dashed-blog-divider

0

Tool Tip: Perfectly Sized Banners


Triple Banner PunchI LOVE the new “banner” look that is so popular today – the big problem is cutting it so it’s even! The Banner Triple Punch (138292) is the perfect solution to this situation! You can punch three different widths, making it SO versatile! The one thing I found, is that I have to add to the length to get just the right size needed.


Here’s my TIP to help you cut that perfect banner:

– For 1” wide banners, add 1/2” for a single ended banner and 1” for a double ended banner

– For 1-½” wide banners, add 3/8” for a single ended banner and 3/4” for a double ended banner

– For 2” wide banners, add 3/16” for a single ended banner and 3/8” for a double ended banner


I hope that will help you make perfect banners every time!!


Embrace the day,

diane-signature


dashed-blog-divider___________________________________________________________________

0

Tool Tip: Simply Scored Scoring Tool

It can be very frustrating when you  jump channels while scoring with the Simply Scored Scoring Tool. Here’s a Tool Tip to prevent this frustration.

3D Style Button "Tips"


Rub your Cardstock and Designer Series Paper with wax paper before putting it onto the scoring plate.  You will find yourself using less pressure and your stylus will glide smoother and thus it’s less likely to jump channels

Breast Cancer Ribbon Button

0

TOOL TIP: Festive Flower Builder

139682O1Many of you have asked me how to easily punch out all of the pieces from the  new Festive Flower Builder Punch (139682). It really is quite simple if you do a bit of cutting initially with the dimensions I’ve given below.

3D Style Button "Tips"

These poinsettias will go together pretty quickly if you simply cut 8-1/2″ x 2-1/2 strips and then stick the strip in Festive Builder Punch exactly where you want to punch. Three of the strips will make one complete flower.


Then you simply need one 6″x 2-1/2″” green strip to punch out three leaves.  For the center of the poinsettia use a scrap of 2″ x 2″ piece of Crushed Curry or such. These are gorgeous when made. You are now ready to start assembling these quite beautiful poinsettias. Here’s how to do that

I’m not sure when I’ll post again, because of our move… Hoping the week after next.  However, I have pre-scheduled my 12 Weeks of Christmas, so you won’t miss a beat on that. And. if you haven’t signed up to receive my newsletter you can remedy that by signing up in my “Welcome Basket” on my sidebar. When you do that, you’ll receive my 12 Weeks of Christmas automatically. This week will feature the third project.


See you all soon.


And, remember to make what you love and love what you make.


Hugs,Breast Cancer Ribbon Button

Siggy-2

0

Oh, Lotus Blossom!

Lotus Blossom Box


Oh, my! I LOVE this FREE Sale-A-Bration Lotus Blossom Stamp Set. The card I featured using it was only the beginning. This stamp set is like the Bow Builder Punch-ADDICTIVE. It’s so versatile and can be stamped in any colors as you’ll soon find out.


Lotus Blossom stamps with tabs


The wonderful things about this stamp are oh, so many! First it’s a Photopolymer stamp set which is great because you can see through it when you’re stamping. And, because the Lotus Blossom is made by stamping three overlays, this stamp set makes it way easy. Not only is it clear, but each piece of the Lotus Blossom has a tab with a number on it.


3D Style Button "Tips"


Here are a few tips for you when using the Lotus Blossom Stamp Set:


As I mentioned above, there are three images to line up to form the Lotus Blossom, there are several ways to achieve this.


1. Since this stamp set is a Photopolymer Set, the stamps are clear. So,  you can line up  by looking and aligning.


2. The second way is, because the stamps have numbered tabs, you simply place the tabs to the top of the mounting block for easy aligning.


Lotus Blossom Tool Tip

3. The third way is to use the Lotus Blossom stamp case. Just match up the stamp case image  with the stamp and stick the stamp on to the case. Place the mounting block over the stamp and all the stamps will line up the way they should. Repeat this with all three numbered stamps making sure the etched side is facing down on the case. I found this way to be pretty accurate. Sometime when using just the tab method the moung of the stamps could be off a bit, but nothing that can’t be remedied by moving the stamp around. All in all, these stamps are very easy to line up and the results are pretty spectacular and you have limitless choices with color.


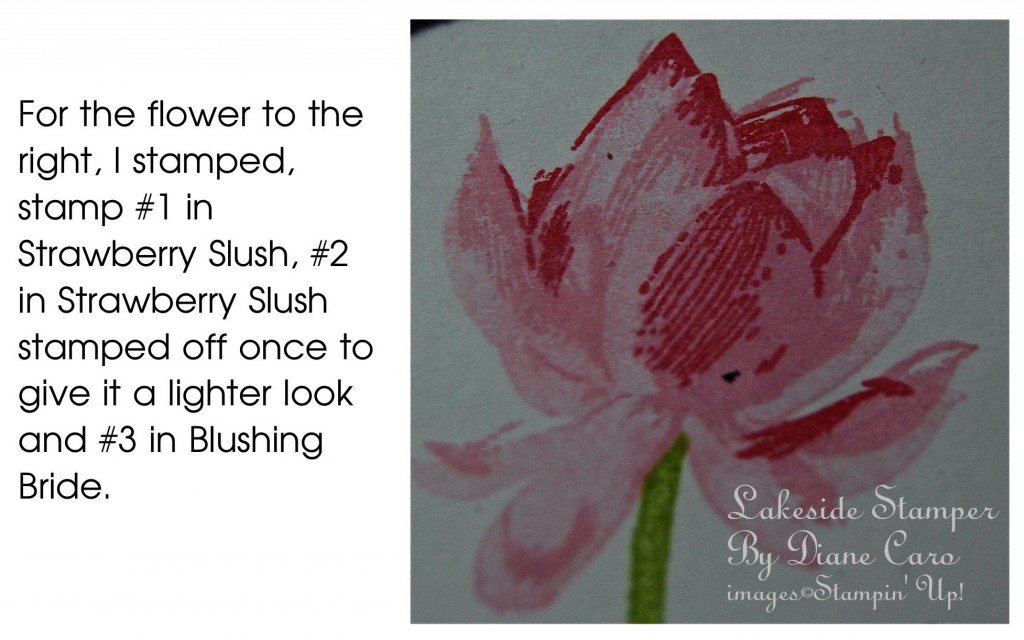
Speaking of color here are two samples of different color combinations:


Lotus Blossom Flower Detail

Lotus Flower Strawberry Slush

Now here are color combination charts for you to download and experiment with. Two charts have two-color combinations and one chart have three color combinations. All you have to do is click on the links and print them out on your home computer, on to Whisper White Card Stock and stamp right on the charts. Follow the directions at the bottom of each chart.


LOTUS BLOSSOM CHART TWO-COLOR COMBINATIONS PAGE 1


LOTUS BLOSSOM CHART TWO-COLOR COMBINATIONS PAGE 2


LOTUS BLOSSOM CHART THREE-COLOR COMBINATIONS


Leave me a comment if you have other color combinations. I’d love to hear from you. And, if you don’t have this Lotus Blossom Stamp Set yet, you have until March 31 to earn it for FREE with your $50.00 Stampin’ Up!  order.


Thanks for stopping by.


Hugs,


Diane Caro, Stampin' Up! Demonstrator

0

Tool Tip Tuesday: Stamp-A-Ma-Jig

Tool Tip Tuesday: Stamp-A-Ma-JigI always recommend that everyone who stamps should have a Stampin’ Up! Stamp-A-Ma-Jig tucked away in their tool drawer. The Stamp-A-Ma-Jig #101049, consists of two pieces, the tool with the non-skid base and a wipe-clean imaging sheet. (Instructions for use comes inside packaging)


The problem I run into is that that I only have one imaging sheet and when I’m working with moreTool Tip Tuesday Stamp-A-Ma-Jig then four stamps, I need to clean the sheet.  Well, I’ve solved the problem with
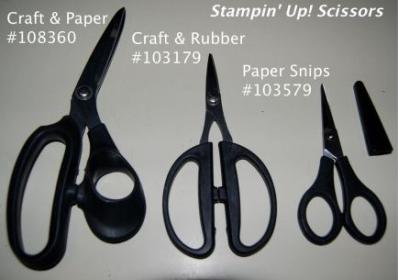
 Stampin’ Up!’s Vellum Card Stock.


I cut the vellum to the size of the imaging sheet and use it just like I would use the imaging sheet that came with the Stamp-A-Ma-Jig.


When I’m finished, I simply store the piece of vellum card stock in the appropriate stamp box. No more cleaning up the sheet after each use and next time I need to stamp a perfectly placed image, it’s there waiting for me, in the box, of the stamp I’m going to use.


Thanks for stopping by!


Tuesday Hugs,

Diane Caro, Stampin' Up! Demonstrator

0

Tool Tip Tuesday: Using the Right Scissors

Tool Tip Tuesday Using the Right ScissorsHow many times have you reached for a pair of scissors to cut a piece of ribbon or card-stock to find the ribbon and card stock catching on the blades of the scissors making that pretty little ribbon tail a mess? Or maybe you tried to cut an intricate area of paper or card-stock with a pair of that were just too big? Scissors are hand operated cutting instruments and using the right size matters. Using the right scissors for the task at hand will make your paper-crafting, sewing project or three dimensional projects have great results.  Well, here are a few scissors tips to get that clean-cut look and the best results when choosing craft scissors for your next project.
Tool Tip Tuesday Using the Right Scissors
Scissors consist of a pair of metal blades, or tangs and are connected in a way, which allows the sharpened edges to slide against each other. The earliest pair of known were invented in 1500 BC in ancient Egypt. These were spring scissors, made of two bronze blades.  The blades were melted or soldered onto handles made from a thin curved piece of bronze. This curve brought the blades together when squeezed. The modern day scissors evolved from these
A few scissors tips, no pun intended, are pretty simple ones.


1. Get the right size scissors for the task at hand. The longer the blade, the straighter and faster you can cut. For example have a 3-3/4″ blade length which makes cutting large areas a breeze. While these Stampin’ Up! Craft and Paper Scissors #108360  are multi-purpose, in that they can cut both ribbon, fabric and card stock cleanly, these would not be good for intricate detail cutting. These scissors are good for a rough draft cut. A rough draft cut is one where you cut around the detailed image to be cut before you do your detail cutting. These are also good for larger images you need to cut.  The handle on the Craft and Paper Scissors are ergonomic, which means they are safe, efficient and comfortable preventing hand fatigue. By the way these are also great for ribbon!

Tool Tip Tuesday Using the Right Scissors
2. Detail cuts are harder to do with longer bladed scissors. Stampin’ Up! Paper Snips #103579 are just like their name suggest. They are perfect for snipping little bits of paper and card-stock Because of their thin, small and 2-1/2″ pointed blades the Paper Snips can cut even the tiniest of areas.


3. To cut tiny details using the Paper Snips hold your paper or card stock with one hands. This is your feeding hand. This hand feeds the paper into the scissors blades. Your other hand holds the scissors and cuts. Just keep turning the paper with your feeding hand as you follow the image outline. Cut slowly using short cuts with the paper close to where the blades connect.


4. To cut your rubber stamps, wire, chip-board sheets and twine you need a sharp and short bladed scissors. Stampin’ Up! Craft and Rubber Scissors #103179  blades are 1-3/4″ and are great for cutting close on your rubber stamps. After cutting your rubber stamps you might find adhesive stuck on the scissors blades. If this happens you
can use a baby wipe or an alcohol swap to clean the blades. Make sure you let the blades air dry before putting them away.


5. To protect your scissors blades always close your scissors when not in use. When possible store them in a protective sleeve. Remember paper and card-stock can dull scissors so have at least two pairs of scissors. One for paper and one for ribbon. Clearly mark them. You can tie a ribbon around the handle of the ribbon scissors for easy identification. Try not to drop your scissors as this can break or knock them out of alignment. Some scissors are what they call, “Double Thumb” which are for both right and left handed crafters. Oh, by the way scissors is always plural!


So, treat yourself to a great pair of scissors or two because you always want to use the best possible and correct scissors when working on your paper and crafting projects.  And, remember what your mother always told you, “Never run with scissors in your hands.”


Hugs,

Diane Caro, Stampin' Up! Demonstrator

0

Tool Tip Tuesday: Easy Bow

Tool Tip Tuesday Easy Bow


Do you still struggle making bows for your finished cards? While there are several ways to make a bow, here’s a quick tip for making a very Easy Bow.


Cut your card stock to desired measurements.Tool Tip Easy Bow


Using a small hole punch. punch two holes equal distance from edges of card stock edge about 1/2″ apart. You can vary these measurements depending on your ribbon width.


Tool Tip Tuesday Easy Bow


Cut a piece of ribbon about 8″ long.  Insert the ribbon ends, threading them front to back equally. Flip your card stock over and crisscross the ends in the back. Thread the ribbon ends back through the opposite holes.


Tool Tip Tuesday Easy Bow


Pull ends and adjust the ribbon. You can add a bit of SNAIL adhesive, so the bow lays flat. Trim the bow ends.


So, there you have it! Now you know how to make an Easy Bow!


And, don’t forget to embrace your creativity today!


Hugs,

Diane Caro, Stampin' Up! Demonstrator

0

Powered by WordPress. Designed by WooThemes

Skip to toolbar