Archive | HALLOWEEN

Black Cat & Roses: Votive Holder

Black Cat and RosesBreast Cancer Ribbon Button

Here I go again with sharing yet another, paper rose project. I can’t seem to help myself~I really love making these paper roses. This is another Halloween Votive Holder that I picked up at my local craft store. This one features black cats.What fun…


Happy Haunting Black Cat Votive

For this votive holder, you’ll need to make about 18 paper roses from the Stampin’ Up! Happy Haunting Designer Series Paper. To learn how to make these paper roses CLICK HERE

Blaack Cat & Roses Halloween Votive


I bought a 4″ Round Wooden Base and adhered the paper Halloween roses around the base. I used a Glue Gun, because I was too impatient to wait for white glue to dry. Once the roses were glued in place, I simply placed the Black Cat Votive Holder in the center of the rose wreath. Another very easy Halloween project that you get to reuse every Halloween…What could be better?


Thanks for Stopping By with siggy

0

Happy Haunting: Spooky Card

Happy Haunting spooky Card Header

Halloween will soon be upon us and to get you in the Haunting Mood, here’s a SPOOKTACULAR card to make for that special family member or friend who just loves Halloween.Happy Haunting Spooky Card

I have to admit this was a fun card to make, becasue each section is a design element in itself.


THE TUTORIAL:


1. Cut a 5-1/2″ x 8-1/2″ piece of Basic Black Cardstock and score it at 4-1/4″


2. Cut the following pieces from Tangerine Tango: 2-11/16″ x 2-11/16″, 9/16″ x 2-11/16 and 3-3/4″ x 2-1/8″


3. Cut the following from the Happy Haunting Designer Series Paper: 2-9/16″ x 2-9/16″, 7/16″ x 2-9/16″ and 3-5/8″ x 2″  Cut these pieces from three different patterned paper.


4. Layer the appropriate DSP on the Tangerine Tango Cardstock


5. Around the 3-3/4″ x 2-1/8″ wrap a piece of Pumpkin Pie Cotton Ribbon. With a smaller piece tie a bow and set aside.


6. Ink up the “Spooky” stamp from the Among the Branches stamp set in Tangerine Tango Ink and stamp it on to a piece of Whisper White Cardstock and punch it out with the 2″ Circle Punch.


7. Punch out a Large Scallop Circle out of Whisper White Cardstock.


8. Adhere the “Spooky” sentiment on to the Whisper White Scallop Circle.


9. With a Paper Piercing Tool and Mat pierce a hole in each scallop and a matching holes on the “Spooky” sentiment layer.

Happy Haunting Spooky Card Sewing


10. Thread a large eyed sewing needle with Basic Black Baker’s Twine and do a simple whip stitch by bringing the threaded needle up from the back of the Tangerine Tango circle  and bringing the needle down the scalloped circle until the end.


11. Affix the sewn element on the 2-11/16″ square with Multi-Purpose Glue.

Happy Haunting Spooky Detail 1


12. Place each element as shown in the photo keeping a 1/4″  border around the outside. With a Glue Dot take that knot you’re  saving and place it on the ribbon.


3D Style Button "Tips"If you want to change this card up to hold a small candy bar, just place tape or glue around three of the outside edges of the 3-3/4 x 2-1/8″  bottom piece. Slip the small candy bar in from the unglued  top edge.


Thanks for peeking at my blog today. I hope it’s inspired you to create something.


And, Remember to Make What You Love and Love What You Make!


Embrace the day,

Siggy-2


0

Halloween: Simple Candy Holder

Today’s share is another “So Simple” project for a Halloween Simple Candy Holder. These can be made for all occasions in appropriate colors.  Fancy up the corners and use them as wedding favors or use primary colors for a child’s birthday party. Believe me these use very little materials (8 can be cut from one 8-1/2″ x 11″ sheet of cardstock) and they go together quickly. So simple…

Happy Haunting Candy Holder


To start cut a 4-1/4″ x 2-3/4″ piece of Basic Black Cardstock to use as the treat holder base. Fancy cut the two top corners with the Curvy Corner Trio Punch,


There’s actually another piece on top of the base that doesn’t really show up. This piece measures 2-1/4″ x 5-3/4” and it’s scored at 3-3/4″ and 4″  This piece holds the candy. Fancy cut using the Curvy Corner Punch the two top  and two bottom corners, The bottom corners will be the flap that folds up. Adhere this piece to the base.


This piece is covered with more of the Happy Haunting Designer Series Paper measuring at 2-1/4″ x 3-3/4″ and 2-1/8″ x 1-5/8″.  Fancy cut the two top corners of each piece.


Now adhere the larger Designer Series Paper as shown. Flip up the flap part and adhere the smaller piece on the flap.


To hold the flap up, tie a piece of Tangerine Tango Ribbon and knot it.


Lastly, slide the piece of candy in and enjoy handing these out.

Thanks for Stopping By with siggy


0

Happy Haunting: Jack-o-Lantern Halloween Hat

Today’s share is a Jack-o-Lantern Halloween Hat. The Halloween Hat sits on top of a Jack-o-Lantern votive holder. DO NOT USE A REAL CANDLE in this, because the hat is made from paper.  I bought the Jack-o-Lantern votive holder at a local craft store and it cost me $1.00.  I saw it and thought I could make something with that. And I did…


Witches Paper Hat This Halloween Hat was created from a template I made for it. I cut the template from a manila file folder after I adjusted the size. After cutting out the template, I traced in on the Happy Haunting Designer Series Paper.


I cut the hat out, placed some Tear and Tape on the one edge and rolled it into a cone shape. I had a small piece of orange feather boa and I glued that to the bottom edge of the Halloween Hat. The tip of the hat I crinkled and bent to resemble a witch’s hat. To finish off, orange, purple and lime green rhinestones were added and glued to the hat. A Tangerine Twist bow was added to complete the look. This hat easily slip on and off for easy access to add a battery operated votive candle.


Here’s the template for the Jack-o-Lantern Halloween Hat


Jack o Lantern Halloween Hat

Thanks for stopping by

Siggy-2

0

Among the Branches: Halloween Bookmarks

Halloween Bookmarks

Here is another project and great hand~out for Halloween. Simple to make and useful, these Halloween Bookmarks can be made along with your children helping.  Attach a piece of candy or a Halloween pencil as an added treat.

Among the Branches Bookmarks 1


Let’s get started on “How To” make these simple bookmarks…


Cut as many bases as you need at 2″x 5″. For these Tangerine Twist and Basic Black Cardstocks were used.


For the next layer of the bookmark cut either cardstock or designer series paper at 1-3/4″ x 4-3/4″. One bookmark was done with Very Vanilla and the other two in Tangerine Twist Cardstock.


The bookmarks third layer was cut at 1-1/2″ x 4-1/2″. The designer series paper used here was Happy Haunting.


Among the Branches Bookmark Detail

For the stamping the Among the Branches Stamp Set was used. For the body of the bookmarks the images were inked up in Memento Ink and the branch stamp was used as a tree trunk.


The “Spooky” stamped images were inked up with Memento Black and Tangerine Twist Inks. A 2″ Circle Punch was used to punch out the stamped images. The Tangerine Twist circle was layered on a Large Basic Black Scallop Circle.


Bows and bookmark tails were made from Basic Black and Lucky Limeade (retired) Bakers Twine. To attache the top tails a slit was punched using the new Curvy Corner Trio Punch which gives you two different curvy corners and a very nice slit/slide for ribbon and such.


And, there you have it a short and sweet post for a simple Halloween Bookmark!

Thanks for stopping by

Siggy-2

0

Cutie Pie: Candy Corn Treat Box

CANDY CORN TREAT BOX

I can’t stop playing around with the Stampin’ Up! Cutie Pie Thinlit. It’s such a versatile die and every time I make a project with it, many more project ideas swirl in my head. I wanted to make a Candy Corn Box in keeping with my Halloween themed blog posts.  I first thought I could glue the Happy Hainting Designer Series Paper right to the Whisper White Cardstock, but that didn’t work. Nothing lined up after it was die cut.  My husband the architect knew it wouldn’t, but he let me figure it out for myself. After a few thoughts and trials I indeed figured it out…

Cutie Pie Candy Corn


HERE’S WHAT NOT TO DO!!

This is what I originally had in mind to do with the Happy Haunting DSP adhered to the Whisper White Cardstock as shown.

Cutie Pie Candy Corn 11


Then I thought, if I ran it through the BIG Shot with the DSP attached, the two die cut Cutie Pie parts would match up, but oh, no they didn’t. The resaon they didn’t line up is because the DSP should run parallel with the bottom of the die. Clearly the sides do not.

Cutie Pie Candy Corn 13


HERE’S WHAT TO DO!!

So, here’s what I did do.  I still adhered a 2-1/4″ x 6″ Hello Honey from the Cherry on Top DSP Stack to the bottom making sure it came up about 2″ from the bottom edge. Do this on two half sheets of Whisper White Cardstock.  This way the bottom flaps of the box were covered as well. Then I cut two of the large Cutie Pie pieces out.

Cutie Pie Candy Corn 12


For the front and back of the Treat Box, I cut two 2-1/2 x 2″ pieces of the Tangelo Tango print from the Happy Haunting DSP and cut them out by placing them in the middle of the die as shown and running them through the BIG Shot.


For the sides of the Treat Box I cut two 2-1/2″ x 2″ pieces of the tangelo Tango. All four pieces were adhered over the Hello Honey with All Purpose Liquid Glue.

Cutie Pie Candy Corn Detail


I computer generated a “Happy Halloween” greeting and printed it out on Hello Honey Cardstock and trimmed it out as a banner. I made a Basic Black Bow and added some orange sequins to the front.


To mass produce these do all your cutting first. They really go together rather quickly and what fun to hand these out this Halloween.


Cutie Pie Candy Corn 2

Any questions you can EMAIL ME. I have more Halloween Projects a comin’...


Happy Haunting Crafting,

Siggy-2


0

Happy Haunting Lolli~Pop Holder

HAPPY HAUNTINGHello and Hello! I’m going to start slipping in Halloween projects here and there. While I’m not one for rushing holidays nor do I want Summer to seem like it’s over (I’m in denial!), I am one for planning and since we do have the time now to make these Halloween Lolli~Pop Holders, why not take the opportunity to do so??? This wonderful Stampin’ Up! Happy Haunting Designer Series Paper is in the new Holiday Catalog which can be ordered now!.


Happy Haunting Loli Pop Holder


This is a “So Simple” and fun project to make for your Halloween handouts to your Trick~or~Treaters.


Here’s the “How To” make this Happy Haunting Lolli~Pop Holder:


1. Cut Basic Black Cardstock at 2-1/2″ x 8″ and score it at 5-3/4″ and 4-3/4.


2. Next cut a 2-1/4″ piece of Tangelo Twist Cardstock.


3. Cut the Happy Haunting Designer Series Paper at 2″ x 2-3/4″


5. Take the Tangelo Twist and the Happy Haunting piece and with the new Curvy Corner Trio Punch, punch two decorative corners on each.

Happy Haunting Lolli-pop Holder


6. Adhere the Happy Haunting DSP to the Tangelo Twist to form a tag. Then adhere the tag to the Basic Black base.


7. Now run the holder through the BIG Shot using an appropriate size Circle Die. The size die you use will depend on the size of your lolli~pop. The circle dies will cut through all three layers.

Happy Hauniting Loli pop Holder side


8. Affix the lolli~pop with some Tear and Tape Adhesive making sure the pop part shows through the circle cut~out and the stick is straight. Place a bit more tape on the inside to close up the top.


9. Take a 12″ piece of Basic Black Baker’s Twine, wrap it around the lolli~pop stick and tie a bow.


These take a little more effort on your part than just handing out lolli~pops or candy, but well worth the effort.


More coming down the line from my again oh, so messy work space…


Embrace the day and happy crafting,

Siggy-2


0

Happy First Day of School: Rolo Pencil

Rolo Filled Pencil Header 2

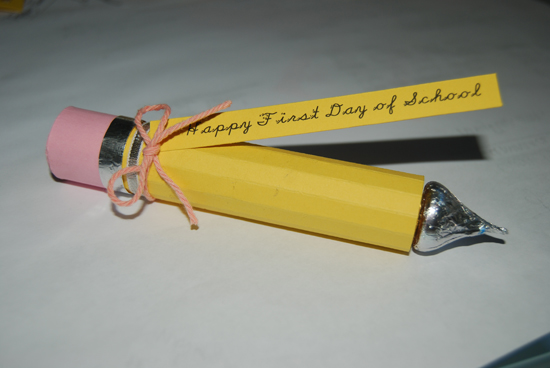
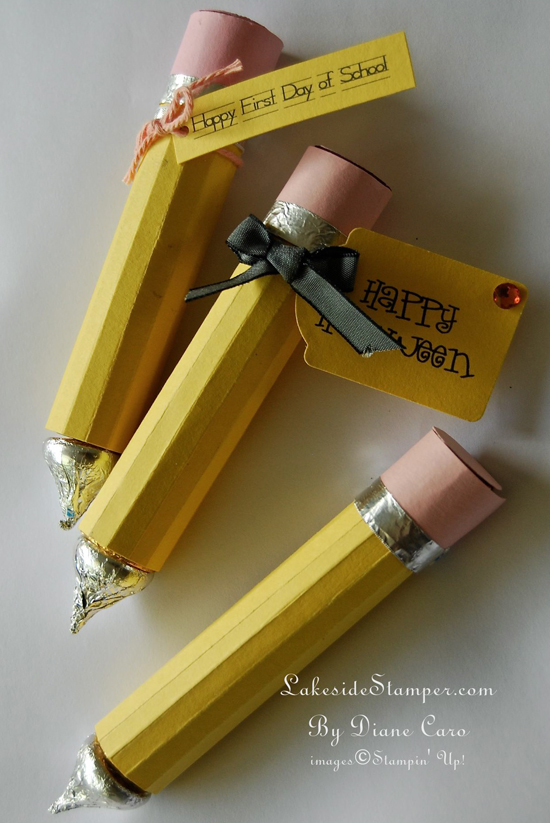
So, here we are at the end of Summer vacation and the beginning of the new school year. Here’s a very quick project to make for your children or your child’s teacher. These are adorable to make and hand out for Halloween as well. I fear that they’re almost too nice to rip open and eat the rolo and hershey candies… Notice, I said “almost!”

Rolo Filled Pencil Final


Rolo filled Pencil Header


Here’s the “How To” make these candy pencils:


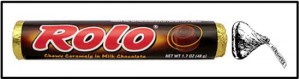
First you’ll need one roll of Rolo’s and one chocolate Hershey’s Kiss for each pencil. Yum…The trick is NOT to eat any as you make these. Maybe buy an extra roll or two just in case.


Rolo Filled Pencil

FOR EACH PENCIL CUT THE FOLLOWING:


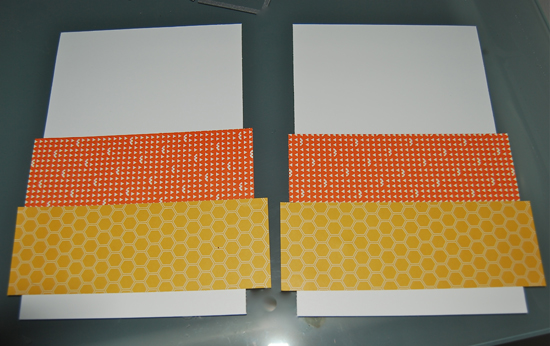
1. One 3-1/2″ x 4-1/2″ piece of Daffodil Delight Cardstock and score it every 1/4″ to the end. Score it along the 3-1/2″ edge.


2. One 1″ x 3-1/2″ piece and one 7/8″ circle from Blushing Bride Cardstock. The circle will be for the top of the eraser.


3. One piece of 1/2″ x 3-1/2″ piece of  silver foil paper or aluminum foil in your kitchen drawer. If using aluminum foil, you have to hand cut it, because a paper trimmer will not work. I cut the same size piece from cardstock and folded the foil around it and used the edge of the cardstock as a guide for cutting.


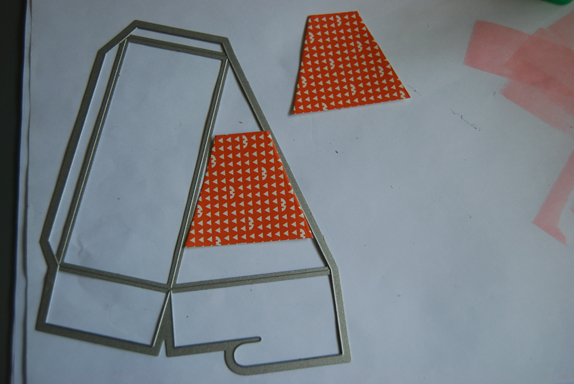
Here is the link, for the above Rolo Filled Pencil Template  for you to print out:

Rolo Filled Pencil Template


ASSEMBLING:


1. To assemble add Glue Dots to the bottom of the Hershey Kiss and adhere it to one end of the Rolo candy.


2. Next add Glue Dots along both 4-1/2″ edges of the Daffodil Delight Cardstock and affix one edge to the roll of Rolo candy. Now roll the candy and the Daffodil Delight, as tightly as you can, until the other Glue Dot edge sticks as well.


3. Take the 1″ x 3-1/2″ piece of Blushing Bride and with a Bone Folder curve the cardstock a bit. Again, add Glue Dots to each edge and adhere this piece over one edge of the Daffodil Delight. Make sure as you do this you line up the top edge of the Blushing Bride with the top edge of the Rolo candy.


4.  Place some Glue Dots on to the 7/8″ circle and place it on the top to finish off the eraser.


5. Place small dabs of All-Purpose Liquid Glue along the bottom edge of the Blushing Bride and adhere the 1/2″ x 3-1/2″ foil piece.


FINISHING TOUCHES:


1. Print out the text on to Daffodil Delight by clicking on this link Rolo Pencil Text


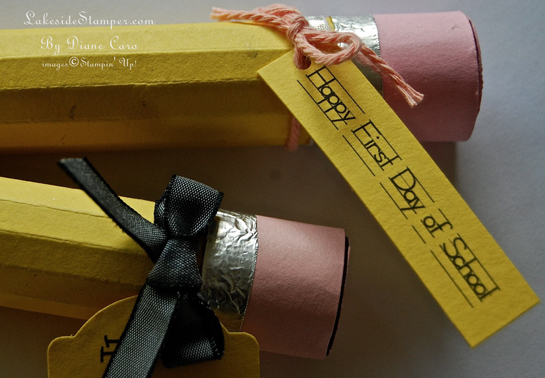
2. Trim up the text, punch a hole in one end and attach it to the Rolo Pencil with a piece of Baker’s Twine or ribbon.


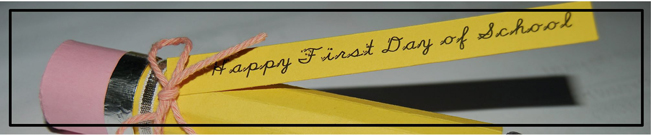
HAPPY FIRST DAY OF SCHOOL PENCIL

Rolo Filled Pencil Detaii 3


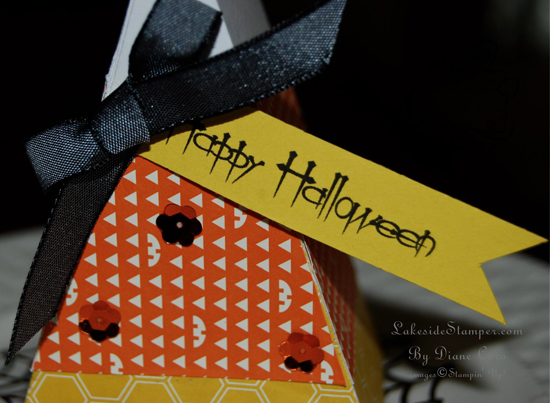
 HAPPY HALLOWEEN PENCIL

Rolo Filled Pencil Halloween


Make it a great year. Make sure to thank your child’s teacher. Make sure to hug your child when he/she gets home from school. And. make sure to make a few of these to pass around. I’m pretty sure these Rolo Pencils will bring a smile to anyone’s face receiving them.


Rolo Filled Pancil 1

Siggy-2

0

Spooky Bingo Bits Halloween Banner…

Good Morning Readers!

Today I’d like to share with you a Halloween Banner I designed for Friday’s class.  I’m going to design one for each holiday as they approach, so look for similar banners for other holidays. I originally wanted to  have a banner that read, “Happy Halloween” with some images. When I was planning it out, I realized it would have been a very long banner with a minimum of 14 circles for the letters alone. That’s when I decided to just incorporate the images. The photo is small, so to enlarge it, simply click on it.

Spooky Bingo Bits Halloween Banner

When making these banner try to remember to make an odd number of circles or pennants, so there’s a middle image or letter.

On a piece of Whisper White Card Stock, stamp various images from the Spooky Bingo Bits stamp set in Basic Black, Wisteria Wonder, Tangerine Tango & Lucky Limeade.

With your 1-1/4″ Circle punch, punch out all the stamped images.

With Basic Black Card Stock punch out five 1-3/8″ Circles.

Using the  Scallop Circle Punch and Tangerine Tango Card Stock, punch out five scallop circles.

Cut five 3″ x 3″ pieces Basic Black Card Stock  Run the pieces through the Big Shot using the Perfect Pennant Die, placing the 3″ x 3″ pieces over the scallop circle part of the die.

Spooky Bingo Bits Banner Detail

With Pumpkin Pie Grosgrain 1/4″ Ribbon, cut four 3″ pieces. Tie the Basic Black Scallop Circles using the open lace holes. I counted seven holes and that’s where I placed the ribbon and tied a simple square knot. I cut each ribbon tail at an angle. It just finishes off the ribbon nicely, as well as, prevents the ribbon from fraying.

After I tied all the scallop circles together, then I adhered all the other punched circles and images.

On each end of the banner I looped a Piece of Tangerine Tango Scallop Dots Ribbon. I made two bows and adhered them with a Glue Dot.

Thanks for stopping by and  make it a great Wednesday.


Stampin’ Hugs,

Siggy 2

0

Powered by WordPress. Designed by WooThemes

Skip to toolbar