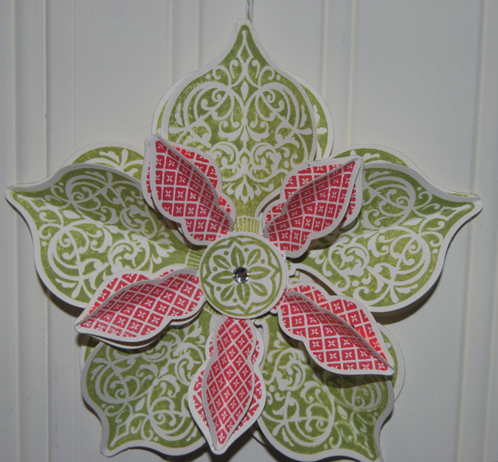
3-D Holiday Ornament
Although Autumn is upon us, it’s never too early to start making those handmade
holiday projects. This ornament may look complicated, but it’s not. Start now, by
making all the components, then assemble them. You’ll be glad you did when you
see them hanging on your tree or the look on someone’s face that you give it to.
holiday projects. This ornament may look complicated, but it’s not. Start now, by
making all the components, then assemble them. You’ll be glad you did when you
see them hanging on your tree or the look on someone’s face that you give it to.
SUPPLIES:
Stamp Set & Die: Ornament Keepsake Bundle (129949) W (129950) C
Paper: Very Vanilla Card Stock (101650)
Ink: Certainly Celery (126958), Real Red (126949)
Everything Else: 1/16″ Circle Handheld Punch (101227), 1″ Circle Punch (119868), 1-1/4″
Circle Punch (119861), Big Shot (113439), Simply Scored Scoring Tool (122334), Basic
Rhinestones (119246),Whisper White Bakers Twine (124262), Multi Purpose Glue (110755),
Multi-purpose Adhesive Sheets (120805)
Here’s What to do:
1. Cut ten 4″ x 3-1/2″ Pieces of Very Vanilla Card Stock
2. On each piece stamp the 3″ x 3-1/2″ widest shaped ornament from the Ornament
Keepsake Stamp Set in Certainly Celery
3. Using the BIG Shot and the same shaped die from the Holiday Ornament Framelits,
cut out all ten stamped images.
4. Score five of the cut ornament shapes from top to bottom using the Simply Scored
Scoring Tool
5. Once scored, fold the ornament shapes into a “V” and on the back score line place a line of
Multi Purpose Glue
6. Line up and adhere these pieces on top of the un-scored ornament shape. Hold for a minute
then place aside. Repeat for all other four pieces.
7. Repeat steps 1-6, only this time stamp the 3/4″ x 1-3/4″ ornament on 2-1/2″ x 1-12″ pieces
Very Vanilla in Real Red

To assemble 3-D Ornament:
8. Cut a 3′ x 5″ piece of Very Vanilla Card Stock and cover it with the same size piece of a
Multi-Purpose Adhesive Sheet
9. From the adhesive sheet and card stock piece punch one 1-1/4″ Circle and one 1″ Circle
10. Peel back the Adhesive Sheet on the 1″ circle and carefully place the larger shapes
equally around. Press down to secure them to the circle. Place aside
11. Repeat step 10 with the smaller shapes and the 1″ circle.
12. Stack two Dimensionals in the middle of the 1-1/4″ circle and adhere the 1″ circle on top
13. On a scrap piece of Very Vanilla stamp the circle from the Ornament Keepsake Stamp
Set in Certainly Celery, punch it out with the 1″ circle punch and stick it on top of the 1″ circle
already in place.
14. For the finishing touch place a Basic Rhinestone in the center and punch a 1/16″ hole on
the top and string a 10″ piece of Whisper White Baker’s Twine for hanging.
.jpeg)
Hugs,
