 Here’s a card that can be made for a birthday celebration or switch out the saying and use it for Valentine’s Day! The new Bloomin’ Heart Thinilts makes it so very easy to make this beautiful and intricate heart cut out. I love this Bloomin’ Love and Bloomin Heart bundle. You can do so much with how you add the die cut flowers. The Bloomin’ Heart cut out and be hand-colored with markers or colored pencils. I chose to stamp and die cut the flowers for this card.

CARD STOCK and CUTTING DIMENSIONS:
- The base of this card is a 7″ x 10″ piece of Whisper White scored at 5″
- The first layer of Blushing Bride is cut at 4-1/2″ x 6-1/2″
- The top Whisper White layer is 4″ x 6″
STAMPING and BIG SHOT:
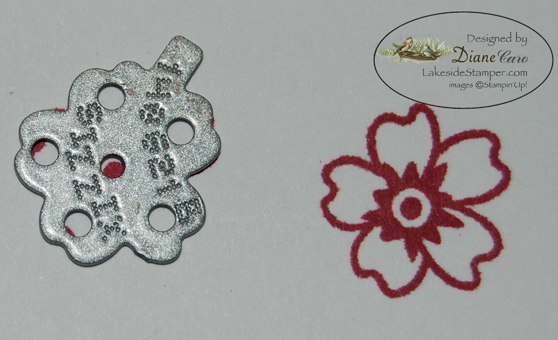
On a scrap piece of Whisper White, stamp the flowers from the Bloomin’ Love stamp set in Rose Red Ink. There are four different flowers; one large outline flower, one small outline flower, one large solid flower and one small solid flower. The phto shows more than what I used, because I stamped and die cut some for my class. Having one BIG Shot would take a long time for each attendee to cut what they needed. All in all I cut and used about three of each flower. You can cut more if you’d like. Take a look below:
- Here are the flowers stamped and ready to go through the BIG Shot

- What I love about this stamp and die bundle is that the stamps have a little tab on them as well as the dies. This makes is fairly easy to line up the die with your stamped images. You can also see the stamped dot in the middle of the flower, which also aids in the line-up.

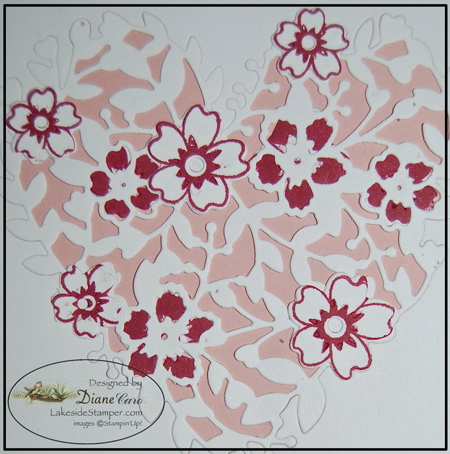
- Once all my flowers were stamped and cut, I ran the top layer of Whisper White through the BIG Shot with the Bloomin’ Heart die. I placed it fairly close to the top making sure I had room for the greeting, which was stamped in Rose Red Ink. The “Happiest of Birthdays to You” is from the Birthday Blooms stamp set.

ATTACHING THE FLOWERS:
If you look closely at the cut out heart you’ll notice several white solid flower shaped areas. These areas are for the stamped and cut out flower images, but before you glue on the flowers look again and you can see negative cut out flower shapes as well.
- For these negative shapes, I glued the solid stamped flowers on from the back with Multi-Purpose Glue. It seems like I’m the only one who loves this glue as the class reminded me! You need to take care that the flower doesn’t go beyond the die cut area.
- I then placed the die cut heart shape into the area it was cut from
- Then I adhered the outline flowers on the front.
- I used Multi-Purpose Glue to attach this layer to the Blushing Bride layer.
- Once I knew it was safe and the glue had dried, I adhered the two attached layers to the card base.
- I also added some Basic Rhinestones to the flowers after I took the photo. Make sure to add some to yours.
I hope this tutorial is clear. Look for more ideas using this fabulous Bloomin’ Love and Bloomin’ Heart bundle in the near future.
Thanks for stopping by.
Hugs,
