My Grandson Jackson loves robots. Here’s the Valentine’s Day Card we worked on and made. The robot was computer generated part by part. A hershey chocolate nugget was used and wrapped in Valentine’s Day paper. So cut and so Jackson!

![]()
My Grandson Jackson loves robots. Here’s the Valentine’s Day Card we worked on and made. The robot was computer generated part by part. A hershey chocolate nugget was used and wrapped in Valentine’s Day paper. So cut and so Jackson!
![]()

Here we go again with the Love Notes Framelits I’m loving them for all kinds of embellishments. The scallop heart border looks so complicated, but of course it’s simple to make with the Love Notes Framelits and the BIG Shot!
🎀 A Quick 5-Step “How To”:
And, there you have it; a quick 5-step card for you to make.
Happy Card-Making!

![]()

With Valentine’s Day almost upon us, here’s a fast yet fanciful card to make just in time to ive to your Valentine! The Love Notes Framelits have everything you need to create this card.

Here’s what to do:
🎀 CARD STOCK & CUTTING DIMENSIONS:
Cut an 8-1/2″ x 5-1/2″ piece of Whisper White and score it at 4-1/4″ This is the card base.
Cut another Whisper White piece at 2-1/2″ x 4-3/4″
Cut a Real Red piece at 2-3/4″ x 5″
🎀 DIE CUTTING:
With the “Sending Love” Designer Series Paper and the Love Notes Framelits, cut the scallop heart strip, the envelopes, card, hearts and teeny note card. To make the heart pocket heart:
🎀 STAMPING:
Stamp “My Valentine” from the Bloomin’ Love stamp set in Real Red Ink.
Layer the card as shown in photo’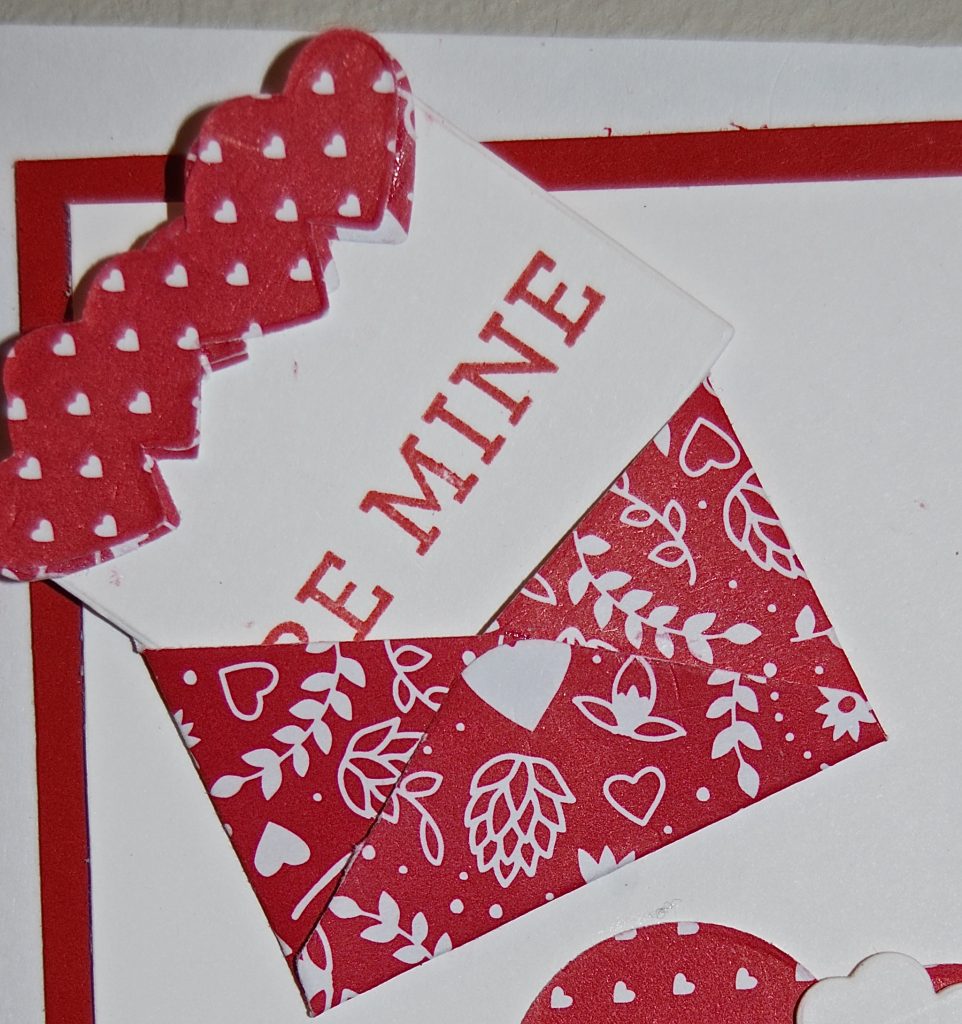
Thanks once again for stopping by, and while it’s too late to order the Love Notes Framelits intime for this 🎀 Valentine’s Day 🎀 you can order it and be prepared for next year. This framelit set can alo be used for wedding and anniversary cards.
Check back for one last Valentine Card Idea. And, please leave me a comment on what types of cards, projects and tips you’d like me to cover. Your feedback is ALWAYS welcome.
🎀 Embrace the day,
![]()

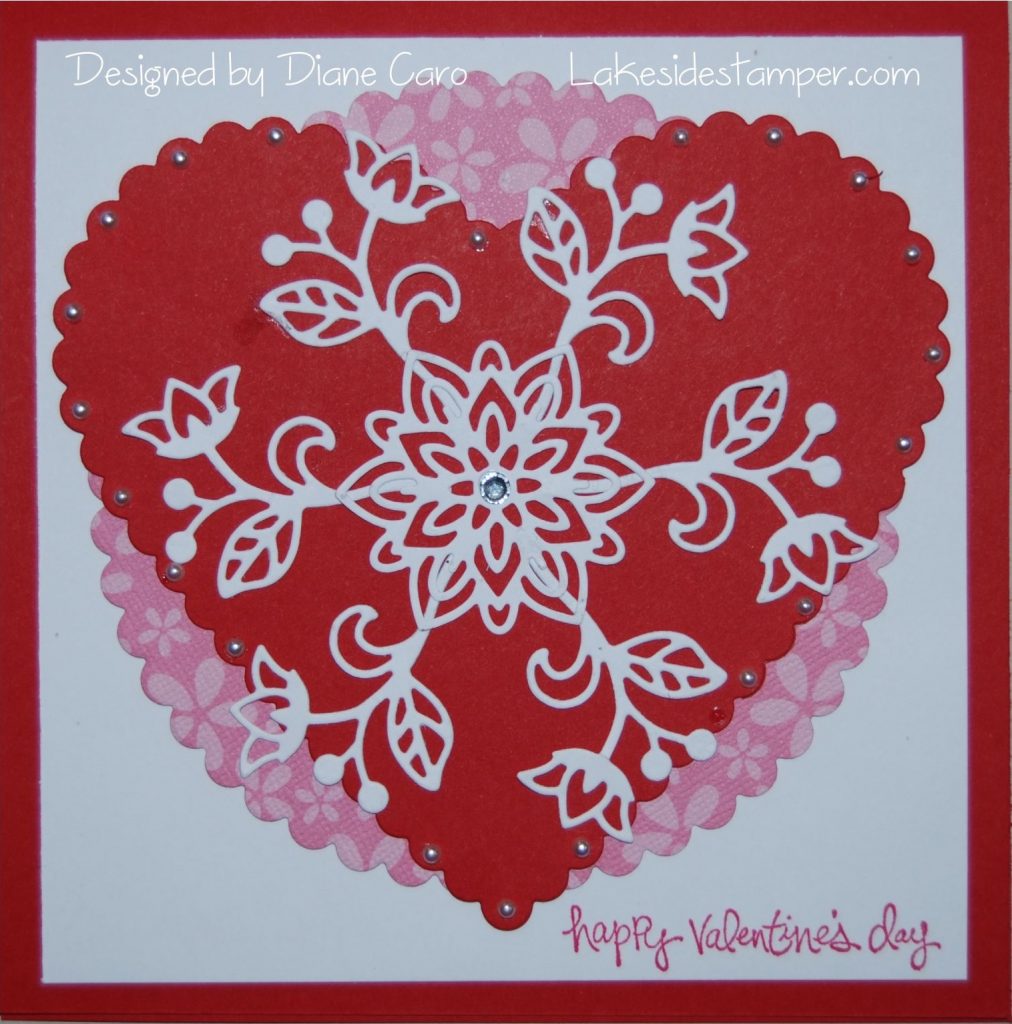
Once again, I have used the Flourish Thinlits to create this paper-cutting themed Valentine’s Day Card. I just love the , Scherenchnitte look without the fuss of fussy cutting!
CARD STOCK AND CUTTING DIMENSIONS:
CUTTING:
STAMPING:
 PUTTING IT TOGETHER:
See what you can do to capture the “Scherenchnitte” look by using different dies. Experiment with different color card stocks and designer series papers. Lots can be accomplish and createde with just a little imagination.
Thanks ever so much for your visit.
Hugs,
![]()
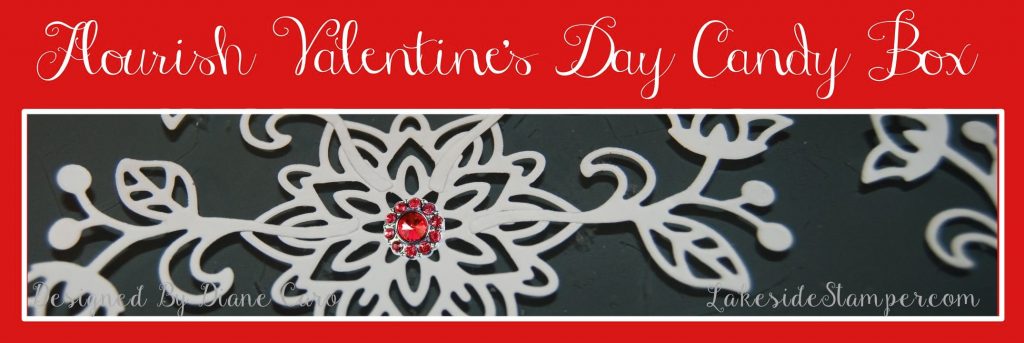
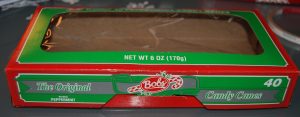 This box was inspired by a box the my all time favorite Bob’s Mini Candy Canes came in. Their box had a clear top to see all the candy canes and resembled a retro box from the 50’s! My box I made out of Real Red Card Stock for Valentine’s Day, but this box can be made in any color for most holidays or any celebration. You can adjust the size as well and I’m going to make a few more of these in smaller sizes, so stay tuned.
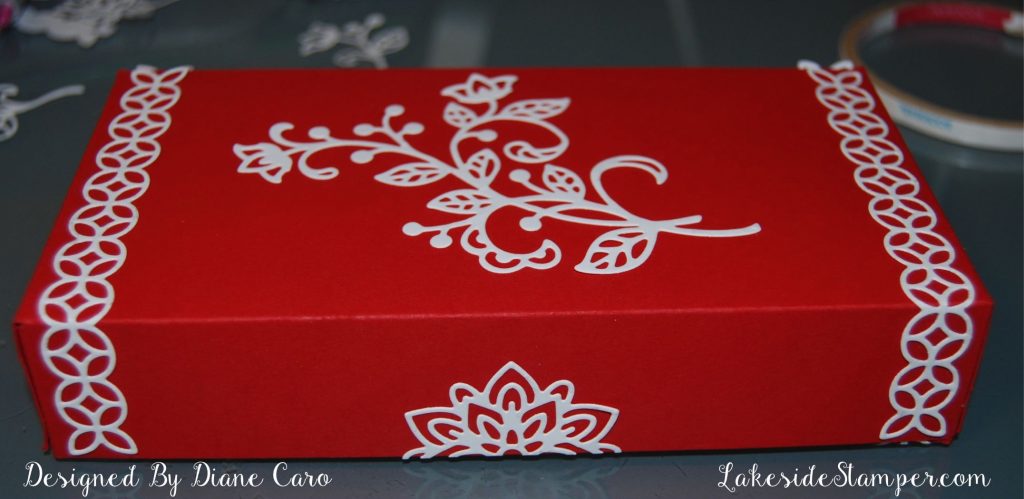
CUTTING DIMENSIONS:

DIE CUTTING:
All embellishments were cut using the Flourish Thinlits and the BIG Shot out of Whisper White card stock.
 Cut the largest floral embellishment.
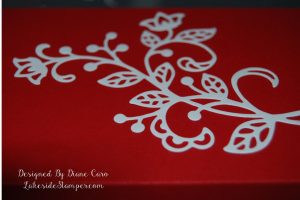
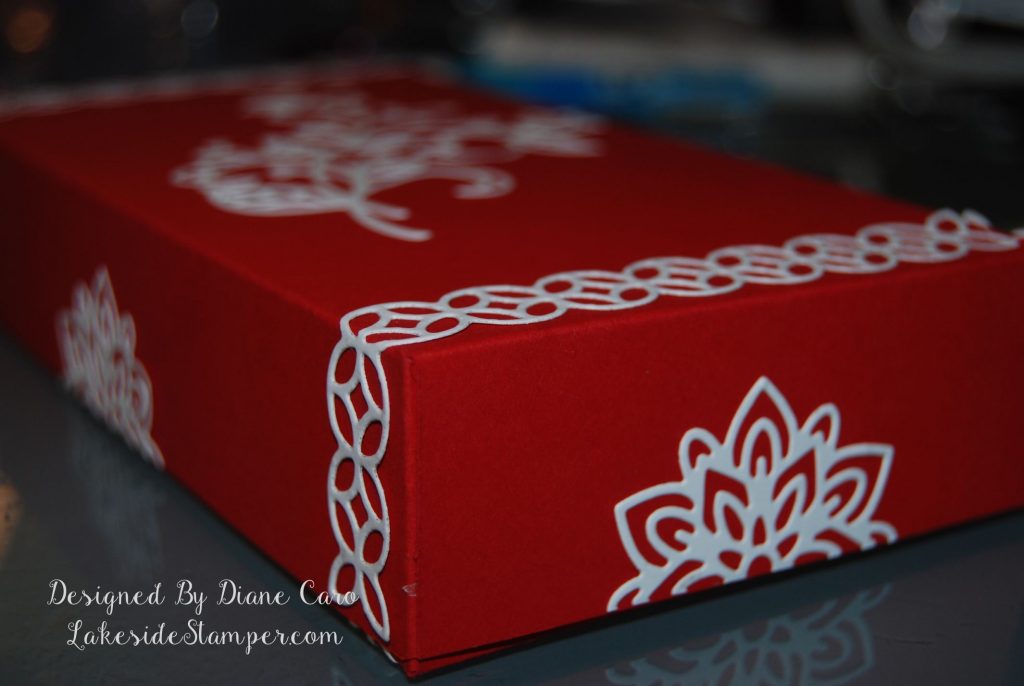
PUTTING IT TOGETHER:
Make some of these and fill them with candy and small trinkets for your Valentine. They’re going to love it!
Thanks for visiting and be sure to check back all week for more Valentine Ideas.
Craft On!
Embrace the day,
![]()

Hi and welcome back! This “French Braid Paper Technique” can be used for so many different paper crafting projects. It’s simple and can use up all those small designer series paper scraps. Once done, your project will look just like a patch work “french braid” hence the name.

Here’s the “HOW TO:”
For this project the new Stampin’ Up! Love Blossoms DSP Stack was used. The pad of DSP measures 6″ x 6″, so it’s perfect for the strips needed for this. As I mentioned if you have scraps laying around the house, use those up.
1.First cut ten or fifteen strips at 1/2″ x 6″. Depending on your project you may want to make the strips longer and cut out more if needed.
2. The following pictures show how to lay and adhere the strips.


I used three different patterns, but any number of patterns can be used. I knew I wanted to cut a heart out, so I used Rose Red, Blushing Bride and Crumb Cake.
3. Once the strips are adhered and you have covered enough surface area, place the die you would like to cut out over your strips and run it through the BIG Shot. For this card I used the Hearts Collection Framelits.

4. The Rose Red card base was cut at 5-1/2″ x 8-1/2″ and scored at 4-1/4″
5. The Crumb Cake layer was cut at 5″ x 3-3/4″
6. The Whisper White layer was cut at 4-3/4″ x 3-1/2″
7. On the bottom right hand corner of the card stamp “My Valentine” from the Bloomin’ Love stamp set in Rose Red Ink
8. Everything was layered and adhered as shown snd three It’s My Party Melon Mambo Enameled Dots were used in two corners..
If you like this card make sure to order the Bloomin’ Love Stamp Set and Love Blossoms Designer Series Paper Stack.
And, don’t forget it’s Sale-A-Bration time. That means for every $50.00 you spend, you get to choose FREE product from the Sale-A-Bration Catalog.
Craft on!
Hugs,

Welcome back to my last With All My Heart Week project: the Love You to Pieces Treat Bag!
These are very easy to make and use scraps of whatever you have. Everybody has scraps of card stock and Designer Series Papers we just can’t part with and this treat bag is perfect for all those scraps!

Here’s what to do:
1. Cut a 2″ x 6″ piece of Designer Series Paper or Card Stock of choice and score at 2-1/2″ and 3-1/2″, Crease the score lines with a Bone Folder. These score lines will be the bottom of the treat bag.
2. Take each end of the treat bag and punch them one at a time with the Ornate Tag Topper Punch.

3. Stack two pieces of Hershey Nuggets. Hold them together with a Glue Dot, Place another Glue Dot on the bottom to hold them in place in the treat bag
4. Place a few Glue Dots to hold the top of the treat bag together. You can also hold it together by threading a piece of ribbon through the tag topper hole. I chose not to use ribbon, because I wanted this little paper bow to shine.
5. And speaking of the perfect little bow…

So happy you spent time with me this week! And you still have time to make these treat bags for tomorrow. If you don’t have the Build A Bow Punch make sure to order one; and for tomorrow, tie a pretty little ribbon one.
![]() Happy Valentine’s Day
Happy Valentine’s Day![]()

Built for Free Using: My Stampin Blog

Hi, Stampers and welcome to the second project of With All My Heart Week.

This card isn’t your typical red and pink Valentine’s Day Card. This card was made from the Stampin’ Up!’s, “Stacked with Love” Designer Series Paper Stack. I used the Calypso Coral as the featured color and somehow it works even with the Basic Black poked in here and there.

I started this card with a 5-1/4″ x 8-1/2″ Whisper White card base scored at 4-1/4″

I then cut a 5″ x 3-3/4″ piece of Whisper White. On this piece I made a collage out of the various Designer Series Papers from the, “Stacked With Love” pad. I random;y cut and adhered the papers until the Whisper White piece was all covered.
I adhered this collage piece on to the card base.
For the Calypso Coral piece of card stock, I cut it to 5″ x 3-3/4″ and randomly with the Hearts Collection Framelits and the BIG Shot I cut out hearts. I didn’t use the cut out hearts on this card, instead I used the negative space, so I could layer it over the collage and the collage colors and patterns would peek through the heart openings.
Before I attached the Calypso Coral over the collage I stamped “Happy Valentine’s Day,” from the Good Greetings Stamp Set, in Basic Black Ink where it fit nicely. Then I place LOTS of Dimensionals on the back of the Calypso Coral layer and adhered it over the collage.

You can use any Designer Series Paper, stamps and even Washi Tape to make your collage. Play around with the colors and patterns and even switch up the framelit dies. This peek-a-boo technique is sure fun and limitless.
See you tomorrow for another, “With All My Heart” fantastic project. I could tell you what it is, but that would ruin the surprise I have for you. And, if you’re a Paper Pumpkins subscriber you’re going to love this project, because I truly thought outside of the box for this one!
Hugs,
Built for Free Using: My Stampin Blog
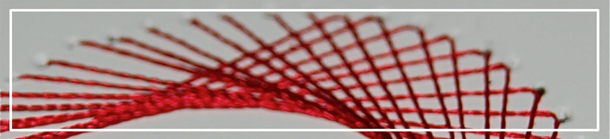
Welcome to my Week of ❤ Heart’s! For this first project I made a Paper Embroidered Framed Heart. This was fun and surprisingly easy using few supplies. The results are spectacular. These photos do it no justice.
I began this Embroidered Paper Heart by piercing a patter on the card stock. There are plenty of patterns on-line you can find for this. All the supplies you need you probably already have. Click on any image for a close-up. So, let’s get started.

The supplies needed for this project are a piercing mat, a piercing tool, card stock, a needle, thread and a piercing pattern. For the mat and piercing tool I used the Stampin’ Up! Pierce Mat (126199) and Paper-Piercing Tool (126189)
Okay, here’s what you do:
Place your piece of card stock on the mat, good side facing up.
Place the dotted heart pattern on top of the card stock in the position you want
With the piercing tool, pierce through the pattern and card stock.
Remove the pattern and you should have the pattern as holes on your card stock.
Turn the card stock over. This is the inside. Select a suitable thread and a sewing needle that works for the thread and passes through the pierced holes easily. Thread your needle. (I used about a 16 inch piece of thread). Secure the end of the thread with tape to the inside of the card stock.

Pass the needle up through the start hole A from the back to the front of the card stock. Follow the directions to the left to achieve this spiral-like pattern.
If you need to re-thread or when you’re finished with the stitching secure the end of the thread once again with scotch tape.
Here’s a close-up of the embroidery stitching:

I hope you’ve enjoyed this first heart project. Please visit all this week for more heart card ideas and more.
See you all tomorrow.
Hugs,
Click on images to order
Built for Free Using: My Stampin Blog
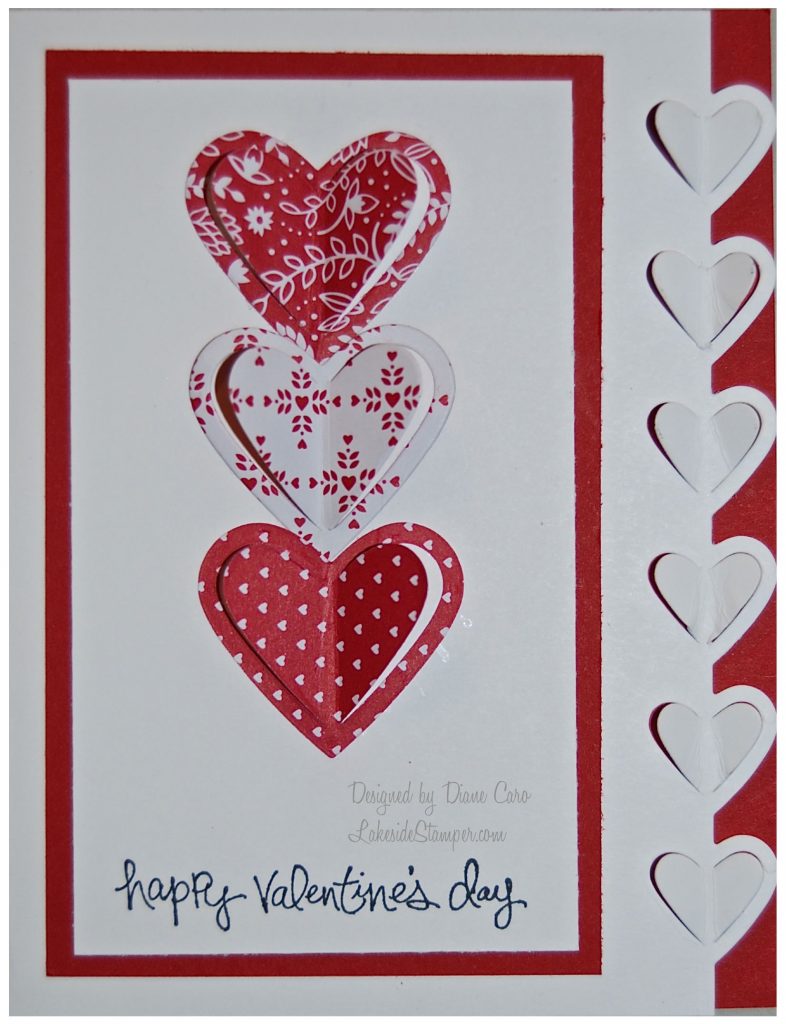
Welcome to the fifth and final “With All My Heart” project.
These are paper hearts made simply from paper strips. I photographed them on a counter, because I couldn’t capture how pretty they really are with a straight on photo. So. let’s get started on how to make these beauties!

To Make these Hearts, here’s what you need to do:

1. Cut two of the following sizes for each heart: 1″ x 4″, 1″ x 6″ and 1″ x 8″
2. Now, listen carefully… you need to stack the strips as follows: one 1″ x 4″, 1″ x 6″, 1″ x 8″, 1″ x 8″, 1″ x 6″ and 1″ x 4″
MAKE SURE THE SIDE YOU WANT SHOWING ON THE OUTSIDE IS FACING IN!
3. After you have the strips stacked the way you want,
staple them together along the bottom edge.

4. Once stapled, pull three strips and curve them together toward the bottom.
Line them up and staple. Do the same to the other side.
You can wait to staple the both sides together.
Once all the strips are in place you should have three nested hearts!
It’s that simple.

To make a garland make as many nested hearts you want, dab glue in the top crevice and stack another heart in the crevice. this project used three hearts.
Affix a piece of ribbon as a hanger on the top heart.
Here’s a photo of one nested heart:

Thanks for spending the week with me.
Come back next week for more Lakeside Stamper exclusives.
Hugs,
