Archive | TECHNIQUES

Ruching Ribbon, the Real Way…

Hi and welcome once again.


I have to tell you I saved the best for last from my Friday Night class. Any one who knows me, knows I LOVE BIRDS!  The moment I see anything with a bird on it, I have to  have it. I think that’s why I feel in love with the Nature Walk Stamp Set from Stampin’ Up! The bird image is magnificent! Stampin’ Up! has the best stamps ever. The lines on their images are so clear and crisp and shows every detail right down to the tinest speck.


Now, while I love birds, I didn’t want the bird to be the main focus here, However, I did want a balance between it and the Ruched Ribbon. Here’s what I came up with: Finished Nature Walk Ruching CardWe started by ruching our ribbon. There is a faster technique to ruching, but, I think the sewing method can’t be beat. The end result is gorgeous!


You begin by measuring the amount of ribbon needed and multiple it by about three.  For instance, if you need a 3″ piece of ribbon, you’ll need to cut a 9″ strip. Along the top edge of the ribbon mark off every inch. Don’t worry about seeing the marks, because once the ribbon is gathered you won’t see them. On the bottom edge of the ribbon mark every half-inch. You need to start your measuring at the beginning edge of the ribbon for both measurements, because, you want the half -inch marks staggered between the one-inch marks. You’re really stitching every inch, but, this is an accurate way to get your marks exactly staggered and in the middle. Understand???? For  this card I used the 5/8″ Certainly Celery Satin Ribbon.

Ribbon Ruching Detail 1Thread your needle with a single thread and a good knot on the end. Then, you simply stitch with a running stitch as shown. the trick is to begin you stitching from the bottom and end the last stich on the top so you can loop around the ribbon’s edge to begin your new row of stitching from the bottom. You stitch your rows from one top edge mark to the other one inch bottom mark. Get it?


Your stitches don’t have to be perfect, nor does the color of thread have to match the ribbon. I used a quilting thread, because it’s a bit stronger and doesn’t break when you gather the ribbon.

Ribbon Ruching Detail 2When you’re done stitching, you simply pull the thread and pull the ribbon away from the thread until the gathering looks appealing to you. The more you pull, the tighter the gather. If the gathering twists, just flatten it out with your hands. Isn’t it beautiful?

Pulled Ribbon Ruching Detail

Once the ruching was done, we moved on to making the card. For this:

Cut a 5-1/2″ x 8-1/2″ of Early Espresso Card Stock and score it at 4-1/4″.

Cut two Very Vanilla Card Stock pieces, one at 4-3/4″ x 3-1/2″ and the other at 4-1/4″ x 3″.

Cut a 5-1/4″ x 4″ piece of Crumb Cake Card Stock.

Cut a 4-1/2″ x 3-1/4″ piece of Certainly Celery Card Stock.

Ribbon Ruching Detail 3

On the smaller 4-1/4″ x 3″ piece of Very Vanilla Card Stock,  stamp the egg image in Baja Breeze, leaf image in Certainly Celery and the bird image in Early Espresso Ink in a random collage pattern. Keep the images more to the left of the Very Vanilla Card Stock.


With Watercolor Pencils color in the bird image and distress the edges of card stock with  the Tea Stain from the Distressing Kit and a Sponge Dauber.


On the right hand side of the card stock, lay a piece of Sticky Strip vertically and carefully layer your Ruched Ribbon on the Sticky Strip. Pull both ends of the ruching to make sure it extends from top to bottom, making sure you have enough of the ribbon to wrap around the card stock.

Finished Nature Walk Ruching Card 2


Layer the pieces of card stock as shown. For the stamped piece of Very Vanilla layer it using Stampon’ Up! Dimensionals. Sit back and admire your creation. This one you won’t want to give away, so you’ll have to make two!


Thanks for stopping by and I’ll see you soon.


Stampin’ Hugs,

Siggy 2


Stampin Up! Product Used in this Project: (Just click on product name to order)

STAMP SET:    Nature Walk

INK:    Baja Breeze, Early Espresso, Certainly Celery

CARD-STOCK:     Early Espresso, Very Vanilla, Certainly Celery, Crumb Cake

FRILLS:    5/8″ Certainly Celery Satin Ribbon, Distressing Kit, Sponge Daubers, Stampin’ Dimensionals, Watercolor Pencils, Sticky Strip

NON-STAMPIN’ UP!:     Sewing Needle, Quilting or Button Thread


0

Embedded Embossed Butterflies…

Welcome, once again Lakeside Stamper Friends!

This card is one we made at my Friday’s Folded Card and Embedded Embossing Class.  Embedded Embossing is the hottest trend today in card-making. This was a hit with all the ladies in the class. They actually got giddy with excitement when it was their turn to emboss their cards. The Embedded Embossing Technique is very easy, but, has very impressive results. I’m always amazed at what one can achieve with paper. See if you don’t agree?

Embedded Embossing Card

Here’s what to do:

For your Card Stock layers,

1.    Cut a 5-1/2″ x 8-1/2″ piece of Early Espresso Card Stock and score it at 4-1/4″.

2.    Cut a 4-3/4″ x 3-1/2″ of Baja Breeze Card Stock.

3.    Cut a 5″ x 3-3/4″ piece of  Very Vanilla Card Stock.

4.    With a piece of  Very Vanilla, the Big Shot and the Lattice Bigz Die cut out a lattice.

5.    With a piece of Pawsitively Prints II Designer Series Paper, the Big Shot and the Embosslits Beautiful Wings, cut & emboss the butterflies.

6.    With Snail Adhesive, tape the Very Vanilla Lattice cut-out on the Baja Breeze Card Stock.

7.    Then adhere the largest and smallest butterfly as shown.

Now comes the magic!

Detail ! Embedded Embossing
8.    Place the Baja Breeze with the lattice and butterflies, in the Square Lattice Embossing Folder and run it through the Big Shot.


9.    With a Paper Piercing Tool, pierce three holes in the bottom right corner and place one Real Red Detail 2 Embedded Embossing Brad in each hole.


10.    Layer the Very Vanilla on the Early Espresso and the Baja Breeze on the Very Vanilla.

11.    Adhere the other two butterflies as shown in the photo.

Sit back and admire the results!

This technique could not be done without the Big Shot. The Big Shot and Big Shot Dies offer an amazing multipurpose cutting system. Cut paper, chip-board, vinyl, fabric, cork, wood and metal sheets and more! Embossing is also made possible with the Big Shot.

If you don’t own a Big Shot  CLICK HERE to order one.

For your shopping convenience, click on the product name in the post text to order that item.

Stampin’ Hugs,

0

Stamped Tile Coasters…

I love this project and so did all who attended my Gift Making Class. These are very easy and inexpensive  to make as gifts and those who receive them will treasure them always.


DSC_0308


Here’s how to Stamp a Tile

::

You’ll first need to go to a local home improvement store and look for un-glazed tiles.


When you get them home rinse them with soap and water and dry.


Choose a stamp that fits nicely on the size tile you chose and stamp the image with Stazon Ink. Let the image dry. Once it’s dry I colored the image with Stampin’ Up! pastels.


Along the edges I just used my finger and smudged the color along the edge of the tile. To insure the color will stay on I sprayed each tile lightly with a clear matte finishing spray.


These are so simple to make you’ll be able to make a set for everyone on your gift list!


DSC_0321

DSC_0323


DSC_0322 DSC_0320

1

Shadow Stamping…

Directions:

1) Stamp image in lighter color; this will be the shadow.

2) Stamp image in darker coordinating color slightly off the first image to create main image.

OR

1) Stamp image in VersaMark Ink on dark card stock.

2) Stamp image a second time in Whisper White Craft Ink slightly off the first image.

OR

1) Stamp image in VersaMark Ink on dark card stock, and let dry.

2) Rub the Embossing Buddy over your card stock, and then stamp image a second time in VersaMark Ink slightly off the first image. Cover with Clear Stampin’ Emboss Powder and heat emboss.

Fotolia_19787887_XS This technique can be also be used with Stampin’ Around Wheels.


0

Using Stampin’ Pastels…

Pastels_sample

Technique A: Chalking

1)   Apply pastel color to your card stock or paper with a sponge-tip applicator, cotton swab, Sponge Dauber, or stiff paintbrush.
2)   Blend the colors as desired with the Applicators or Blender Pen. When using blender pens, just touch the pen directly to the corner of the chalk to pick up the color.

Technique B: Poppin’ Pastels

1)   Stamp the image with a white Craft Stampin’ Pad or VersaMark® ink pad. ST-10-A
2)   Use sponge Daubers to apply the pastel color directly to the ink.
3)   Blow off any excess powder. (Repeat this process if you are using this technique with a Two-Step Stampin‘ set.)

QUICK TIP

Fotolia_19787887_XS To avoid smearing, gently dab the chalk rather than rubbing it across the image.


To order Stampin’ Pastels Click Here


Stampon New Color Pastels


0

Graduation Card for Alexis…

DSC_0476

 On Saturday,  like many of you, we went to a graduation party for my girlfriend Janet’s daughter, Alexis. This is the card I made for her. On the inside I stamped, “Cheers to You.” I wanted something a little different then the usual cap and gown, black and white card. While this Vellium Glass Card is not new this is my own original design
.

RECIPE:
Stamp Set:            Tart and Tangy

Ink:                           Green galore

Paper:                     Vellium Card Stock
                                     Whisper White  Card Stock (10″ x 7″) and (6 1/4″ x x 4 1/4″)
                                     Green Galore Card Stock  (4 1/2″ x 6 1/2″)
                                     Pixie Pink Card Stock  scraps
                                     Basic Black Card Stock

Accessories;           Chunky Crystal Glitter, 2-Way Glue, Stampin’ Pastels, Dabber, 1 1/4″ Circle Punch, Wide Oval Punch, Large punch, Trio Flower Punch, Paper Umbrella,  Drinking Straw, Green Galore Brad

HERE’S WHAT I DID:
I first sketched a glass onto a piece of tracing paper. You could use a plastic glass and trace around it.
Here is a picture of the sketch. I know it’s not fancy but it did the trick.

DSC_0474
I made a template from cardboard, added a 1/4″ on each side, traced it onto Vellium Card Stock, and scored each side on the 1/4″.  I  then added color with my Stampin’ Pastels and a Dabber on the inside of the Vellium. Then on Whisper White Card Stock I stamped the lime slices in Green Galore Ink and cut each one out. On the scrap of of Pixie Pink Card Stock, using the  Trio Flower Punch I punched a handful of flowers for the outside of the glass. I had some umbrella picks which are sometimes used in drinks so I cut one in half to use on the card. Using the Basic Black Card Stock I cut out a graduation cap and added detail with the Signo White Gel Pen. Next came the tassel made from gold thread held in place by a Green Galore Brad. I cut a drinking straw in half and using Tacky Tape I adhered the graduation cap. To put card together I scored the Whisper White Card Stock ( 10″ x &”0 at 5″, layered the Green Galore Card Stock (4- 1/2″ x 6-1/2″) on and then layered the Whisper White Card Stock  (4-1/4″ X 6-1/4″) on. Using my Snail Adhesive I adhered the lime slices on the inside of the glass.  I glittered along the rim of the glass using 2-Way Glue. I put Tacky Tape  on each 1/4″ seam, bent the seams under and placed the glass onto the card. I then adhered everything as shown above. This card would be great also as an invitation.   

 DSC_0540
        Alexis, (the graduate) Blake, Megan and Craig

Thanks for stopping by!

Hugs,
 Siggy-2
0

Father’s Day Origami Card…

           DSC_0273

This is one of the Father’s Day cards we made at the workshop along with the pen and pad tin, pencil cup holder and one other shirt and tie card. See the directions for the tin and cup holder on my blog. I found directions for the origami card and redrew the illustrations and added labels. I also added to my shirt a slit going down the center of the shirt with button brads. I think it looks pretty realistic for folded paper!

RECIPE:
Stamp Set:        All Year Cheer (retired)

Ink:                      Versa Mark

Paper:                 Sahara Sand Card Stock ( 5-1/2″ x 8-1/2″ ) scored at 4-1/4″
                                Pacific Point Card Stock (5″ x 3-3/4″) plus a scrap piece
                                Porcelain Prints (4″ x 6″) for shirt and (2-3/4 x 3-1/2″) and (2″ x 3-1/2″)

Accessories:    3 button brads, Bone Folder, Wide Oval Punch, White Embossing Powder, Heat Tool, 
                                3-1/2″ piece of Pacific Point Striped Ribbon, Green Galre Brad

HERE’S WHAT I DID:
I first stamped “Happy Father’s Day” in Versa Mark onto the Pacific Point Card Stock scrap, covered it in White Embossing Powder, Heat it with a Heat Tool and punched it out using the Wide Oval Punch. Then I layered the Porcelain Print DSP (2-3/4″ x 3-1/2″) and (2″ x 3-1/2″) pieces onto the (5″ x 3-3/4″)  Pacific Point Card  Stock with Snail Adhesive.  I then wrapped the Pacific Point Striped Ribbon as shown, adhered the “Happy Father’s Day” and added a Green Galore Brad.  I layered the Pacific Point Card Stock with all on it to the Sahara Sand Card Stock. I made my origami shirt and using Snail Adhesive I placed it on the card.

HERE ARE THE DIRECTIONS FOR THE ORIGAMI SHIRT:
                   DSC_0453
Simply follow the above steps and when you do the last step which is to bring the bottom of the paper up to fit under the collar untuck it and cut down the middle/front of the shirt to the fold and fold the two to corners out to form another collar. (See card sample) Add button brads going down the cut line and then tuck it under the top collar. I started with a 4″ x 6″ piece of DSP. Practice on a piece of copy paper first. Doing it large first helps to understand the origami folds and using a Bone Folder helps tremendously.

Origami (折り紙 origami?) (from oru meaning “folding”, and kami meaning “paper”) is the traditional Japanese art of paper foldingThe goal of this art is to create a representation of an object using geometric folds and crease patterns preferably without the use of gluing or cutting the paper, and using only one piece of paper.

Hugs,
 Siggy-2
0

Heat Embossing

For the best results when using a dark colored card stock use white embossing powder or any light colored embossing powder.  If using a light colored card stock use a dark embossing powder. This will give you the best contrast. For this image, Chocolate Chip card stock and White Embossing Powder was used.

Happiness is a Journey Detail
WHAT YOU NEED:

Heat Tool
Stampin’ Up! Embossing Powder
Powder Pals
Embossing Buddy
Versa Mark Pad
Card Stock or DSP
Stamp of Choice

HERE’S WHAT TO DO:

1. Choose a stamp image.
2. Ink up the image with Versa Mark.
3.  Over a Powder Pal tray, cover image with Embossing Powder.
4. Using a Heat Tool hold the image 4-5 inches away and heat the image until the powder turns shiny and melts.

3D Style Button "Tips" Rub an embossing buddy over your paper to keep the embossing powder from sticking anywhere but the VersaMark

Hugs,

Diane Caro, Stampin' Up! Demonstrator

0

Father’s Day Pad and Pen Tin…

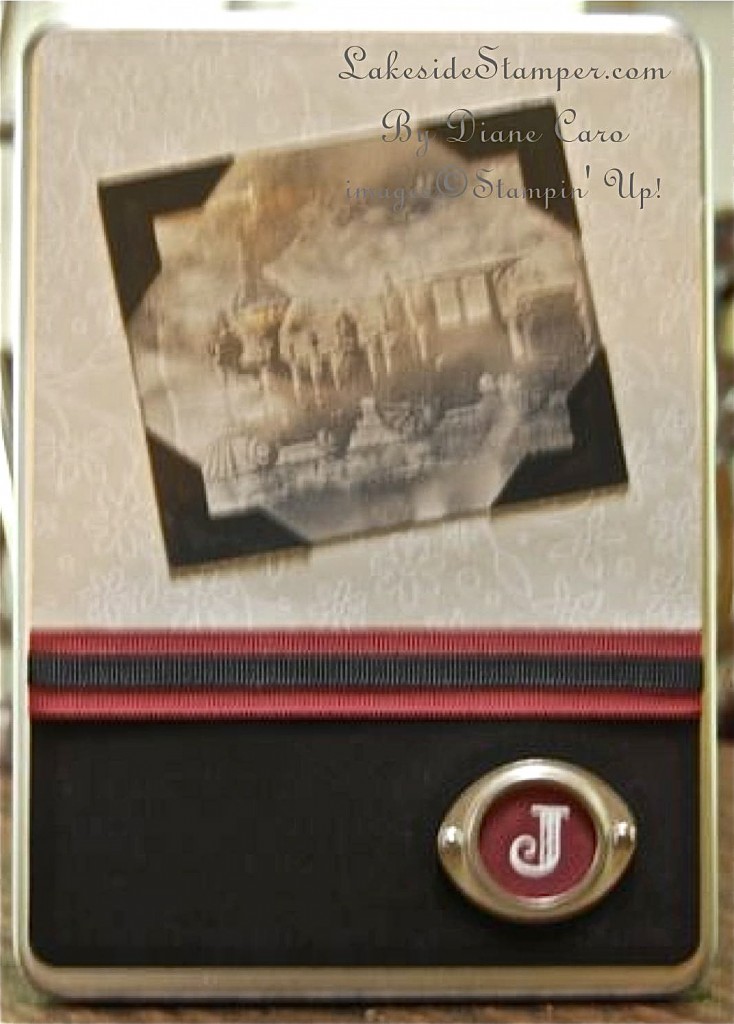
This is a CD Holder Tin which happens to hold a pad and pen inside. Below is the inside of the tin. On the inside cover I added a few pockets for business cards.

Soot Technique 5-27-09
The “Soot” technique was used on the front image. I explain that technique HERE.
RECIPE:

Stamp Set:   Happiness is a Journey 
                       Alphabet Set ( Mine is not SU)
Ink:               Versa Mark Pad
Paper:           Glossy White large enough for your image
                       Delicate Dots DSP (5″ x 4-1/2″) and (5″ x 3-1/2″) for inside pocket
                       Black Textured Card Stock (5″ x 2-1/2″) 
                       Bravo Burgundy (1″ punched circle) and (5″ x 2-1/2″) for inside pocket
                       DSP Strip for top of pad (1/2″ x 5″)
Accessories: Candle, white embossing powder, hodgepodge silver hardware, basic black and bravo burgundy ribbon, photo corner and 1″ circle punches, brads, sticky tape.

HERE’S WHAT TO DO: 
1. Choose an image and use the “Soot” technique.  Trim around the image. 


2. Tape together the Delicate Dots DSP ( 5″ x 4-1/2″) and the Black Textured card stock (5″ x 2-1/2″) papers and round the corners with the Corner Rounder Punch.
Father's Day Pad & Pen 5-09


3.  Using VersaMark stamp an initial onto a piece of Bravo Burgundy, heat emboss and punch out a 1″ Circle. Place initial into the hardware and secure onto the Black Textured card stock with two brads.


4. Cut both ribbons, layer and wrap around seam where both papers meet.


5. Adhere the two paper, ribbon and hardware piece to the tin using Sticky Strip.


6. Adhere the glossy piece with the soot image to the tin and using the Photo Corner Punch, punch four corners and adhere to image corners.


7. Layer in pockets on the inside cover and adhere strip of burgundy to the top of the pad.

I hope whoever you make this for they totally enjoy and appreciate it.

Hugs,

0

“Soot” Technique

Soot Technique 5-27-09


For the image on this pad and pen tin the “Soot” technique was used. 


Here’s what you need:

Glossy Card Stock

Candle (A tapered candles works faster then a pillar candle)

Rubber Stamp

Matte Spray Sealer


Please do this technique using caution. Over a sink is a good place in case paper catches on fire, although I have never had it happen.


Here’s What to Do:

1.  Light the candle.

2.  Using tweezers hold the card stock’s edge and touch the flame with the card stock, glossy side to the flame, and keep moving card stock through the flame until soot accumulates on card stock. Experiment how dark you want the card stock to become.

3.   Hold the card stock  by the edge and place with the glossy side up on the counter taking care not to touch the soot.

4.  Use an un-inked rubber stamp and stamp image onto the soot covered card stock. The stamp will pull off the soot and the image will appear. If you’re not happy with the image repeat the process.

5.  Spray lightly with a matte sealer.


Hugs,


Diane Caro, Stampin' Up! Demonstrator

0

Powered by WordPress. Designed by WooThemes

Skip to toolbar